Having decided to build your own monitoring solution, once
the OS has been installed, your next step should be to harden it. In
considering the steps needed for hardening your OS, it is best if you take
advantage of existing best practices and customized them to your specific environment
and its’ requirements. In this post, we will take advantage of some guidance from
various sources such as Center for Internet Security (CIS), RedHat, SANS and
NIST 800-123 (not necessarily in that order).
Leveraging the NIST 800-123 guidelines, let’s break this out
into sections, so that we identify our areas of focus. NIST recommends we focus
on the following:
- Patch and upgrade the operating system
- Ensure unwanted software are not running
- Configure operating system user authentication
- Configure resource controls
- Install and configure
additional security controls, if needed
- Once
the above are completed, it then recommend that we test our operating system by
looking at the output from NMAP and or Nessus
Removing Unnecessary Software
Before we look at patching and upgrading, let’s take a look at what is currently running with our default “minimal” install of CentOS 7.

Once you have found it, next perform an install using “yum install net-tools”.
Next we run “netstat -nlutp” to identify the listening UDP and TCP ports.

This is good information and from the above we see that we have services listening on port 25 (SMTP) and 22 (SSH). We will keep SSH for now but see no need for a mail server on this box. So before we upgrade, let’s remove unwanted services. In this case we will remove SMTP (2699/Master).
“yum remove postfix” will remove postfix from our install. This is one less software for us to upgrade, manage and or harden, as it is not needed.
Additionally, you could execute “chkconfig --list” or “systemctl
list-unit-files | grep enabled” or “systemctl list-units | grep service” to see
what may be configured to start up at boot time.
Updating existing software
Ensuring that our system stays updated, is an important step. Trying to manually manage your updates can become an exercise which you loose interest in. As a result it makes much sense if you have a script or some other automated process to check and or update your installation at least daily. Beware that automatic updates may cause unexpected issues as updated software may break your existing installation.
Configuring user
authentication
The next most important step is controlling user
access. For starters when we perform a “cat /etc/passwd” we see a number of user
accounts which are not needed for our install. 
Now that’s a lot of users. Let’s reduce the list to something that is a bit more reflective of what we would like to see. To remove some of these users, along with home directory, etc. run the command “userdel --remove --force”. In this example, we delete ftp, postfix, operators, games and polkitd. It is important here to not just delete users for deleting purposes. Some of these accounts may be used by processes which you are not aware of.
To now add a user, let’s execute the command “useradd --comment "Nik Alleyne" --create-home --shell /bin/bash nik”. This will create user “nik” and then we execute “passwd nik” to set our password.
I then modified the user to add the “nik” account to the “wheel”
group using the command “usermod --groups wheel nik”. This ensures that the “nik”
account can perform “sudo” operations as the “wheel” group is part of the “sudoers”
file and is not commented.
Let’s also modify the “/etc/login.defs” to control how passwords are used. We will set the max password days to 180, min pass days 7, min password length 10 and let’s give ourselves 14 days of warning before the password expires.

Let’s wrap up user access by configuring how SSH is accessed from the network. We will set the Login grace time to 2 minutes, while at the same time disabling root login. Maximum tries for authentication would be 6 and allow up to 3 SSH sessions at once.

Another critical component for us is to ensure NTP is installed, configure and hardened to synchronize time..
We will leverage the following 4 servers for time synchronization within our "/etc/ntp.conf".

Now let’s verify our time is properly synchronized.

The above says our time is synchronize, so let's move on.
Testing
our OS
Now let’s assume we did all the hardening steps recommended from these documents which are applicable to our environment, the next step would be to run a VA Scanner or some other utility against the server. For our purposes let’s run NMAP to see what shows up.
Below we run a NMAP Syn Scan against the host while at the same time trying to determine the services and versions. The results show Open SSH 6.6.1 is running on port 22. This scan tests all TCP ports from 1-65535.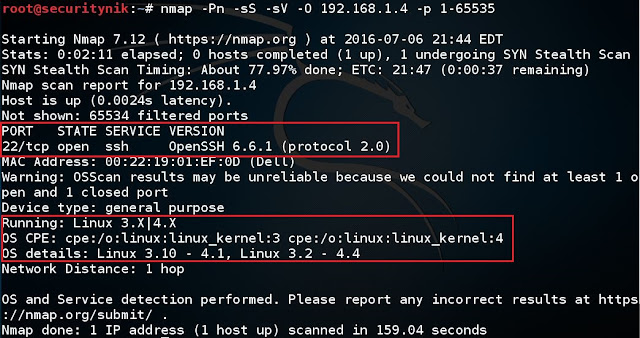
Additionally you should test all the UDP ports which may be opening on your system.
Obviously, there is a lot more to configure when leveraging these guides. My recommendation is you continue going through these guides to get a good grasp of what is required for hardening your environment. You may not need to set every option. However, it is important that you know your environment and the options which are available to you.
Now let’s assume we did all the hardening steps recommended from these documents which are applicable to our environment, the next step would be to run a VA Scanner or some other utility against the server. For our purposes let’s run NMAP to see what shows up.
Below we run a NMAP Syn Scan against the host while at the same time trying to determine the services and versions. The results show Open SSH 6.6.1 is running on port 22. This scan tests all TCP ports from 1-65535.

Additionally you should test all the UDP ports which may be opening on your system.
Obviously, there is a lot more to configure when leveraging these guides. My recommendation is you continue going through these guides to get a good grasp of what is required for hardening your environment. You may not need to set every option. However, it is important that you know your environment and the options which are available to you.
See you in the next post where we configure Palo Alto to forward its logs to our monitoring solution which will be running free Splunk
All Posts In This Series.
References:
NIST 800-123 - http://csrc.nist.gov/publications/nistpubs/800-123/SP800-123.pdf
https://access.redhat.com/documentation/en-US/Red_Hat_Enterprise_Linux/7/pdf/Security_Guide/Red_Hat_Enterprise_Linux-7-Security_Guide-en-US.pdf https://security.uri.edu/uploads/CIS_CentOS_Linux_7_Benchmark_v1.1.01.pdf
https://www.sans.org/media/score/checklists/linuxchecklist.pdf
http://unix.stackexchange.com/questions/146190/commands-not-found-netstat-nmap-on-centos-7
http://www.nncron.ru/help/EN/working/cron-format.htm
No comments:
Post a Comment